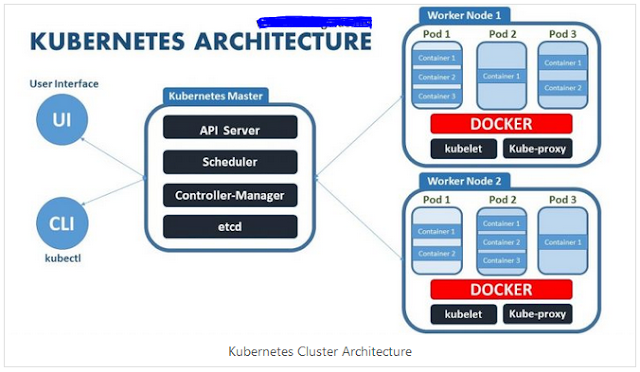
In order to proceed further in understanding how to install and use Kubernetes, it is important to have some foundational knowledge about Kubernetes and containers. With container you can run variety of software component and Kubernetes is used to manage those container so termed as “container management technology”
Pre-requisite as per above diagram
* Master Node
* Worker Node-1
* Worker Node-2
The first step in setting up a new cluster is to install a container runtime such as Docker. In this tutorial, we will be installing Docker on our three servers in preparation for standing up a Kubernetes cluster
Installation Of Docker
For Ubuntu:curl -fsSL https://download.docker.com/linux/ubuntu/gpg | sudo apt-key add -
sudo add-apt-repository \
"deb [arch=amd64] https://download.docker.com/linux/ubuntu \
$(lsb_release -cs) \
stable"
sudo apt-get update
sudo apt-get install -y docker-ce sudo docker version Installation Of K8s
Now that Docker is installed, we are ready to install the Kubernetes components. I will be installing Kubeadm, Kubelet, and Kubectl on all three servers.curl -s https://packages.cloud.google.com/apt/doc/apt-key.gpg | sudo apt-key add -
cat << EOF | sudo tee /etc/apt/sources.list.d/kubernetes.list
deb https://apt.kubernetes.io/ kubernetes-xenial main
EOF
sudo apt-get update
sudo apt-get install -y kubelet kubeadm kubectl kubeadm version Kubelet – An agent installed on every node responsible to make sure desired no. of container are running inside pod.
Kubectl – Client used to interact with k8s cluster
Kube-proxy – Responsible to control the flow of traffic in and out of the cluster using iptable rules


![postgresql selected, no connection error [!] - Metasploit](https://blogger.googleusercontent.com/img/b/R29vZ2xl/AVvXsEgQKS0oDDpFb_0XZiUdvscT1fUEBlxfFy7IBVyBrEPxZ6Ad4UK_pZIt_al8104FEqQfsRkrn5S7mI5JvzqpigcMr6qqkctzsuJiFREhHVSvlIkQf7low2AIAUfcPyVtY1fkmnx-_ZgZLls/s72-c/2ENTk2K2.png)


![postgresql selected, no connection error [!] - Metasploit](https://blogger.googleusercontent.com/img/b/R29vZ2xl/AVvXsEgQKS0oDDpFb_0XZiUdvscT1fUEBlxfFy7IBVyBrEPxZ6Ad4UK_pZIt_al8104FEqQfsRkrn5S7mI5JvzqpigcMr6qqkctzsuJiFREhHVSvlIkQf7low2AIAUfcPyVtY1fkmnx-_ZgZLls/w72-h72-p-k-no-nu/2ENTk2K2.png)
No comments:
Post a Comment